

This is my third Christmas of crocheting and every year I look back and can’t quite believe how far I’ve come. This year my friend asked me to make her some seaside themed decorations for her Christmas Tree. I made her the beach huts earlier this year, you can find the pattern HERE. All for her holiday home on the Isle of White.

I started out with the idea of some crochet appliques and found some Russian and Japanese crochet diagrams to follow. They came out really well but they didn’t make me buzz with excitement. The mermaid in particular was tricky to follow as I don’t read Japanese and don’t know anyone who does. The few scant words of guidance were lost for me and the patterns aren’t great for sharing because they are complex. I have left it too late to do a tutorial but maybe I will do one next summer for a new beach themed garland or wreath.

I am always short of time but I do love to give a gift at Christmas that I’ve put all my love and effort into. I decided on crochet baubles after seeing some amazing ones on pinterest. You can follow me on pinterest click HERE to find my page. I wanted the baubles to be quick and simple so I could make lots and so that I could share them with you. I made lots of apple cosies when I was re-learning to crochet so I had the idea on how to start the bauble. I did a pattern search and had a go at a free pattern that I found to give me the idea of what I wanted, the size and increase and decrease method. This is my one:-
You can find this pattern over on Ravelry by a brilliant designer Carmen Heffernan click HERE It’s a really easy pattern that you make in two halves and stitch together so you can crochet it over a bauble that has the top to hang it from. I really like the spike stitch it works brilliantly for this project, its very effective.
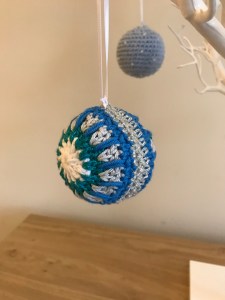
I have designed two different baubles the first one is the simplest one that I’ve shared in this post, just double crochet (single crochet US). You can change the colours as you crochet or just use the same colour throughout and embellish the baubles with beads and simple stitched stars. I did silver stars and white opaque beads, plus some stripy ones.
")
")
")
")
They take around 30 minutes to make from start to finish so are super quick to turn round once you get the hang of crocheting on the polystyrene ball. I am still busy making them in all different colour themes to give as gifts in my homemade hampers for Christmas.
Here is the free pattern for you to have a go to too.
Supplies
6 pack 6cm (3 inch) polystyrene (styrofoam) balls, I bought mine from The Range in the UK, in the craft section. Walmart sell similar in the US.
Stylecraft Classic Cotton in various shades one 100g ball will make many baubles. You can purchase this yarn at love Crochet click HERE .
I also used Twilleys fingerling sparkly yarn you can find this on Love Crochet click HERE This was used to sew on the stars on the white bauble as shown in the picture above and used it as one of the strips on the stripy bauble.
There are no special stitches
3.5mm hook (US size E4)
Seed beads in your chosen colour to embellish your plain bauble.
Beading needle for sewing on the seed beads
Ribbon for hanging
Tapestry needle for finishing
Pattern notes:- Make sure you pull your magic ring tight before you insert your polystyrene ball. You may need to add an extra row dependent on how much of the fingerling yarn you use because its not as thick as the Stylecraft Cotton. You can add the extra 2 rows after Row 12 just before you start to reduce the stitches in each row, once you’ve made one you will be able to judge when to add the extra rows. Ch 1 at the start of each row does not count as a st.
Abbreviations (UK Terms)
sl st – slip stitch
ch – chain
dc – double crochet
dc2tog – double crochet 2 together
Special Stitches
dc2tog = insert the hook in the chosen stitch, yarn over, pull through, insert the hook into the next st, yarn over, pull through, yarn over pull through both loops on the hook.
Click HERE for the chart to do the conversion of stitches to US terms.
Pattern
Start with a Magic Circle
Row 1: (Colour A) ch 1, 12 dc in the magic ring sl st in the first Dc to join (12sts)
Row 2: ch1, 2 dc in the same st, 2dc in each st around sl st in the firs dc to join (24sts)
Row 3: (change colour ) ch1, 1dc in the same st, 2dc in the next st, repeat 1dc, 2dc around (36sts)
Row 4: ch1, 1dc in the same st, 1dc in each st around (36sts)
Row 5 – 12: repeat row 4 change colour every 2 rows (add two more rows after row 12 if you are using the sparkly fingerling yarn)
Row 13 – Insert your polystyrene ball into the cup you’ve now made – ch1, 1dc in the same st, 2dctog, repeat 1dc, 2dctog around, sl st into the first dc (24sts)
Row 14: (Change colour) ch 1, 1dc in each st around (24sts)
Row 15: ch 1, dc2tog around (12 sts)
Row 16: using the same colour, ch 1 dc2tog around (6sts) cast off leaving a long tail.
Finish by weaving the last row together with tail you’ve left. Trim your yarn and thread your ribbon through the top of the bauble to hang it.

Copyright 2017. Please note this post contains affiliate links. Please refer to the Terms for more information.
Such a lovely design Amanda! Simple but oh so beautiful! Brilliant… 😊😊
Thank you very much I’ve really enjoyed making them xx